Build Podman from Source: 5 Easy Steps
Podman provides the pre-built binary for all major platforms including Mac, Windows & Linux then why do you need to "Build Podman from Source"
Kashyap Merai / / podman · 7 min read
Introduction: Build Podman from Source
Podman is an open-source, Linux-native tool for building, running, and deploying the application using the Open Container Initiative (OCI). Podman provides the identical API to Docker for running the containers. Check the blog below to see which one is good for your project Podman or Docker?
Podman provides the pre-built binary for all major platforms including Mac, Windows & Linux then why do you need to “Build Podman from Source”?
Building Podman from source allows the developers to test the new features, patches, and customization to their specific needs. Building from source provides the best compatibility on the platform and improves the security to verify the integrity of source code and binary.
Let’s check the prerequisites before moving to “Build Podman from Source”.
1. Prerequisites
Installing the necessary packages is important before you start building Podman from the source.
Attention needed
Currently, it’s not officially supported to build Podman from source as a non-root user. It requires to install all the build and runtime dependencies in the user’s home directory.
Operating System Requirements
We’ll focus mainly on Linux in this blog but following the same guide will work for the other platform.
MacOS
The build process may change from the Linux and there’s no clear documentation on how to build Podman from source on macOS. I advise you to check the relevant dependencies on macOS and install them along with this guide.
Windows
You can follow this guide for building Podman from the source with the Windows Subsystem for Linux (WSL), as it provides the terminal environment as Linux.
You can install Podmanon Windows by downloading the Podman Windows Installer from the official Podman release page.
Dependencies
Install Build Dependencies
On Fedora:
# Install build dependencies
sudo dnf -y builddep rpm/podman.spec
On all RHEL and CentOS first install the dnf-buildep:
# Install build dependencies
sudo dnf -y install 'dnf-command(builddep)'
Now you can install build dependencies:
# CentOS Stream 8
sudo dnf -y builddep rpm/podman.spec --enablerepo=powertools

# CentOS Stream 9
sudo dnf -y builddep rpm/podman.spec --enablerepo=crb

# RHEL (8 and newer)
sudo dnf -y builddep rpm/podman.spec --enablerepo=codeready-builder-for-rhel-$(rpm --eval %{?rhel})-$(uname -m)-rpms
Install Runtime Dependencies
On Fedora:
sudo dnf -y install \
  conmon \
  containers-common \
  crun \
  iptables \
  netavark \
  nftables \
  slirp4netns
On Debian and Ubuntu:
sudo apt-get install \
  btrfs-progs \
  crun \
  git \
  golang-go \
  go-md2man \
  iptables \
  libassuan-dev \
  libbtrfs-dev \
  libc6-dev \
  libdevmapper-dev \
  libglib2.0-dev \
  libgpgme-dev \
  libgpg-error-dev \
  libprotobuf-dev \
  libprotobuf-c-dev \
  libseccomp-dev \
  libselinux1-dev \
  libsystemd-dev \
  netavark \
  pkg-config \
  uidmap
Development Tools
Let’s install the essential development tools:
Software Tools:
- Go Programming Language: Podman is written in Golang, so you need to install Golang in your system to build Podman from source.
- common: Conmon is a container monitoring for Podman.
- crun / runc: OCI-compliant runtime used by Podman
Stop Googling Podman Commands
Grab the cheat sheet that gives you the right commands, right when you need them.
2. Downloading Podman Source Code
Once you have installed all the necessary prerequisites, you need to download the source code files to build Podman from the source.
Let’s download the Podman source code from the repository on GitHub:
Cloning the Podman Repository from GitHub
Open your terminal and use the git clone command to cloud the Podman repository:
git clone https://github.com/containers/podman.gitLet’s verify, git clone create the local directory for the Podman repository on your system.
# Verify and go to the podman directory
ls podman
cd podman
The Podman repository has multiple branches and tags for the different versions. Check that you are on the correct branch before you build the Podman from the source.
git branch -a
git tag -l
You can switch to a specific branch or use the main branch:
git checkout mainOr you can git checkout the specific version:
git checkout v5.0.2This will allow you to build and test different versions of the Podman from the source code.
3. Building Podman
Let’s build the Podman from the source:
Set Build Tags
In Golang, a build tag provides the way to define the tag, and based on that your compiler determines what piece of code to include during the build process. This helps you to build a Podman binary that supports various features.
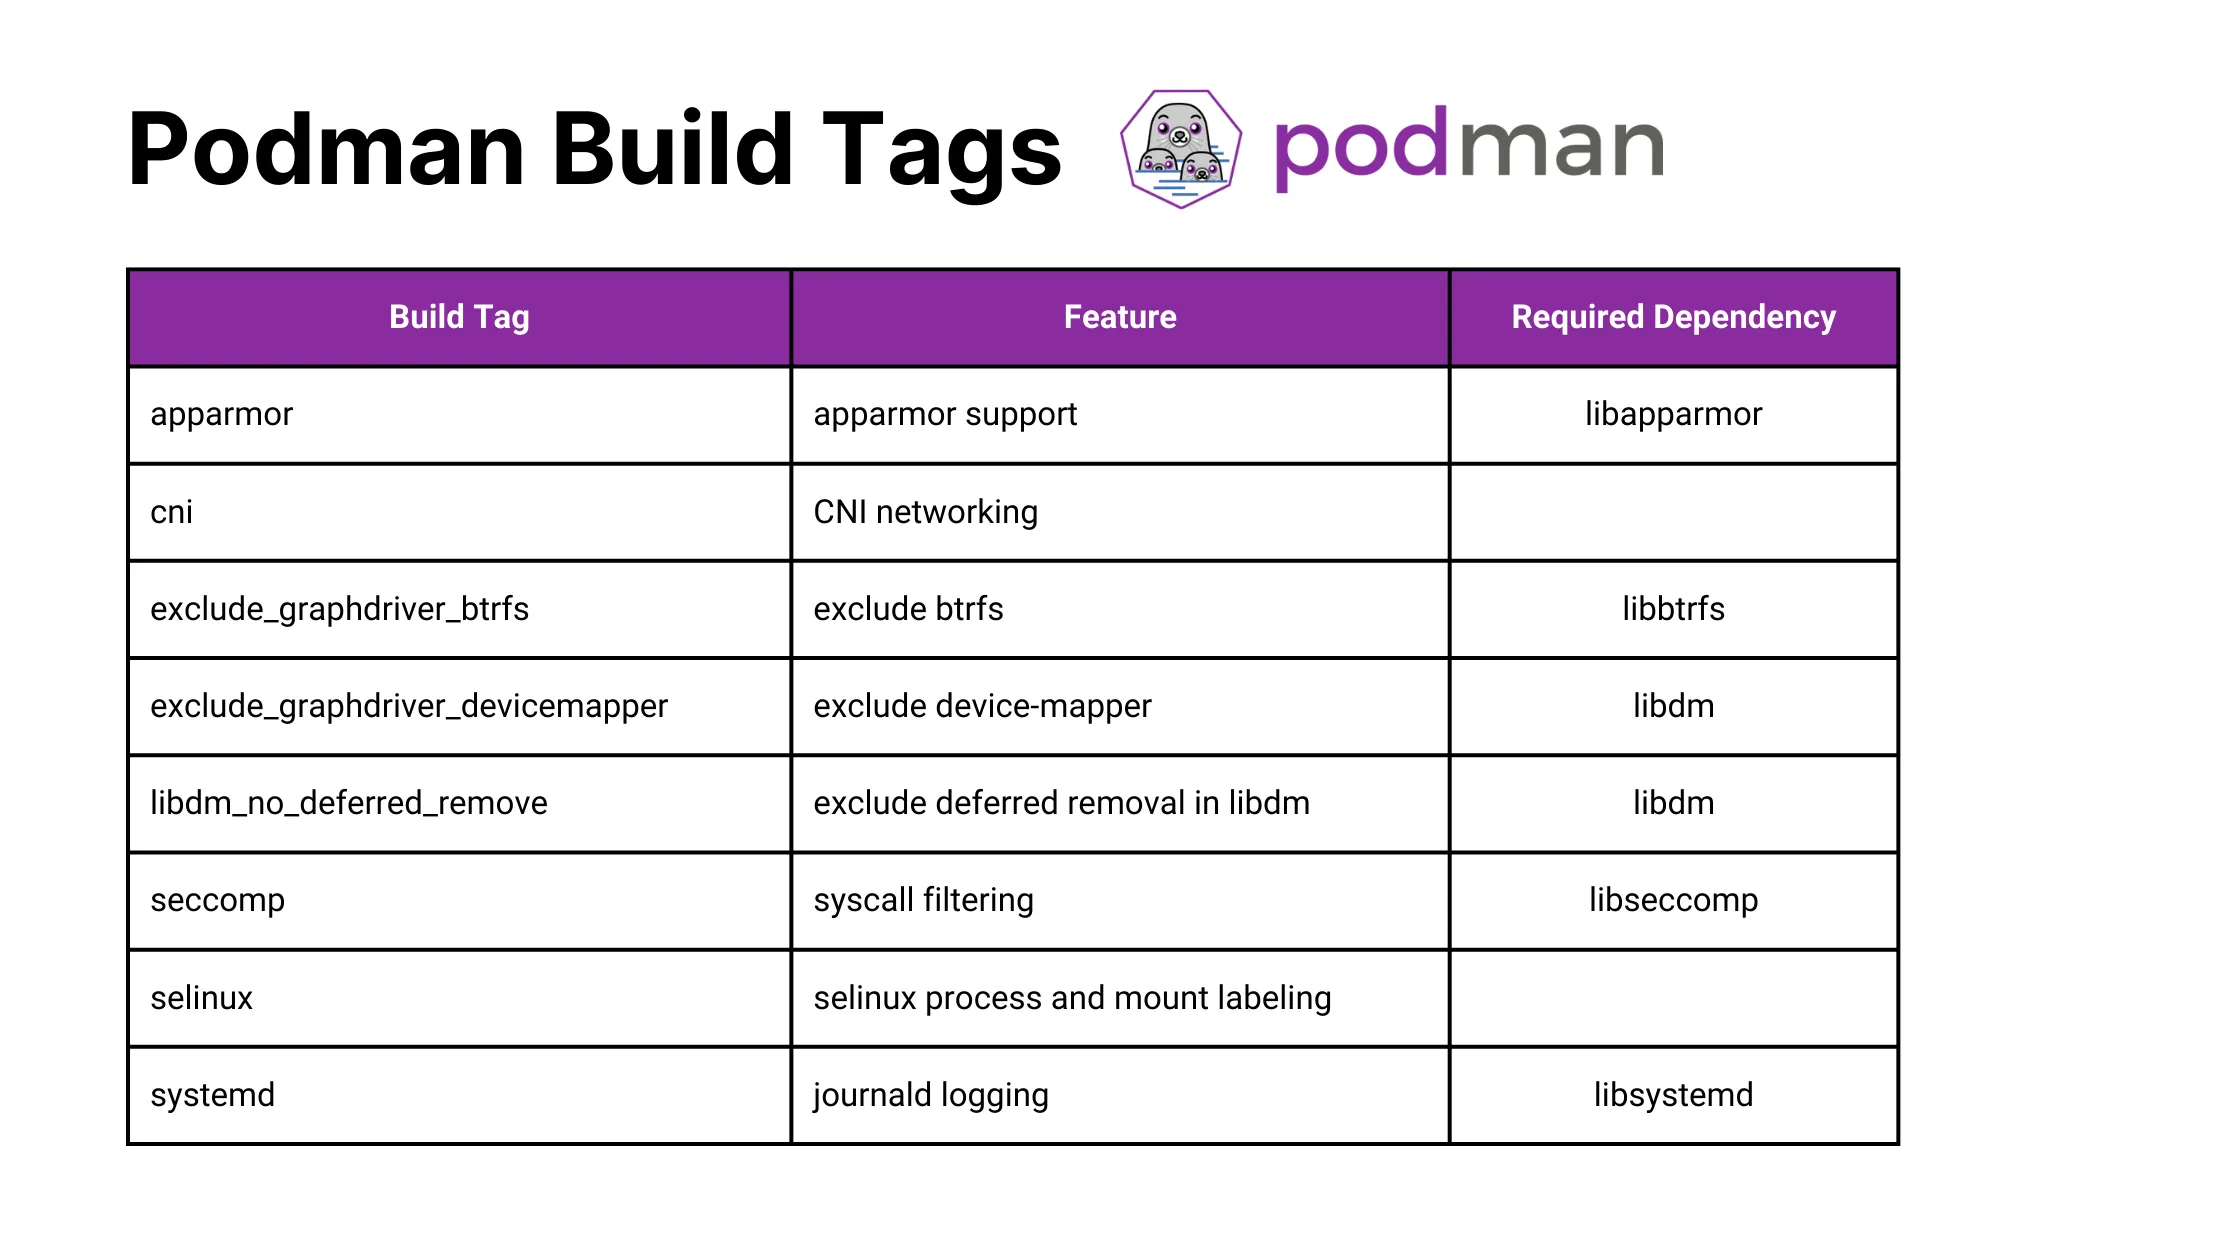 Build Podman from Source: Build Tags
Since Podman is built with the Golang, Podman supports BUILDTAGS. You need to set the variable before building Podman from the source.
# Make sure you're in source code dir
cd podman

# Set the BUILDTAGS for features
make BUILDTAGS="selinux seccomp" PREFIX=/usr

# Install the binary
sudo make install PREFIX=/usr
If you want to build the Podman without the selinux seccom support you can set the BUILDTAGS=""
# Set the BUILDTAGS empty
make BUILDTAGS="" PREFIX=/usr

# Install the binary
sudo make install PREFIX=/usr
Only Podman CheatSheet You'll Actually Use
Get the essential commands to manage containers faster - zero fluff, 100% useful.
4. Testing the Build Podman from Source
To verify and test the Podman has been successfully installed you can run the below:
podman --versionAdditionally, you can check the help for additional commands with Podman:
podman --help
podman <subcommand> --help
Perfect now that you’ve Podman installed successfully, let’s run the container to verify the functionality:
podman run -dt -p 8080:80/tcp httpd:latestThis command will pull and run the httpd container, you can open port 8080 on your browser to verify it’s running.
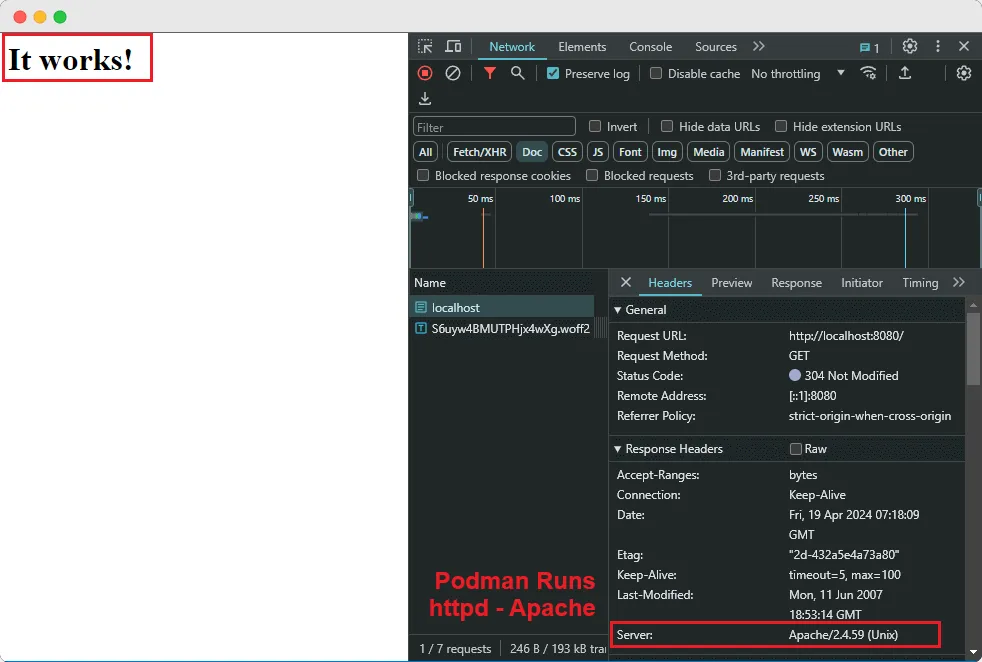 Build Podman from Source - httpd Apache
You can verify the running container with Podman:
podman ps

CONTAINER ID  IMAGE                          COMMAND               CREATED         STATUS             PORTS                  NAMES
a1b2c3d4e5f6  httpd:latest  /usr/sbin/httpd -D…  5 seconds ago   Up 3 seconds ago   0.0.0.0:8080->80/tcp   blissful_leakey
5. Troubleshooting Common Issues
If you face an issue while building Podman from the source, check the common issue you might face and the solution to fix it.
Dependency Issues
If you miss one or more dependencies during the prerequisite steps, you might face build failure due to missing dependencies. (e.g: gcc is missing not found )
Solution:
Carefully read the error message and identify the missing dependency. Install the missing package from the package manager or build it from the source. (e.g: You can install the gcc with sudo apt-get install gcc on Debian.
Check the official Podmain site for the required dependencies for building Podman from the source.
Build Process Errors
If you encounter an error message during the build process, examine the build logs and find the specific error details. You can look for the specific line causing the error in the source code.
Solution:
Once you Identify the issue you can check for the online communities and Podman GitHub repository issues. Search for the specific keyword and check the solution if other members face similar issues.
You can also enable verbose more with make VERBOSE=1 for the detailed output.
Permission Issues
This is the most common issue during the installation process: “Permission denied”
Solution:
Check if you have sufficient permission to run the installation system-wide usually with the root user. Use the sudo when running the make install
Verify the installation path mentioned in PREFIX. Check you have the write permission to that directory.
Follow the above solution and tips to effectively troubleshoot the issue when building the Podman from the source. Remember to check the Podman documentation and online forums for assistance.
Conclusion
Congratulations🎉, for successfully building the Podman from the source.
Let’s summarize the topics we’ve learned so far:
- Prepare the environment with build & runtime dependencies.
- Download the Podman source code.
- Build the Podman using the
makecommand and optionally customize it withBUILDTAGS - Test the Podman for successful verification.
I hope this guide helps you to build the Podman from the source and test it. If you want to learn more about the Podman, don’t forget to check the articles:
Podman vs Docker: Choose the Right One
How to Use Docker Compose with Podman

Kashyap Merai, a Certified Solution Architect and Public Cloud Specialist with over 8 years in IT. He helped startups in Real Estate, Media Streaming, and On-Demand industries launch successful public cloud projects.
Passionate about Space, Science, and Computers. He also mentors aspiring cloud engineers, shaping the industry's future.
Connect with him on LinkedIn to stay updated on cloud innovations.